Unit 4


Monster
Plan:
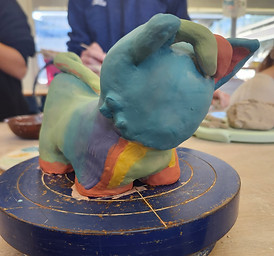
1. Wedge clay and separate into 4 balls. Make two pinch pots for the head, joining them together and making a small hole to let air escape.
2. With the other balls, form a double pinch pot in a longer, oval shape. Score the head and body together
3. Form two triangles for the ears and score onto the head. Form two cylinders for the snakes and attach behind the ears. Press in two indents for the eyes.
4. Form a larger worm shape, pulling out a shape for the snake head. Score + slip the snake onto the body.
5. Create 4 cylinders, hollowing out through the bottom and creating a paw shape at the bottom. Score + slip the legs onto the body and create an arc in-between the front legs.
6. Pull out triangles for the cheek fluff.
7. Underglaze according to the drawing. Fire.
8. Clear glaze and fire at cone 05-06.
Reflection:
I struggled a lot with this piece. I made about 3 separate attempts, and the one I ended up with is more or less what I wanted. It did not end up being entirely accurate to the drawing; the head is a bit too big and the expression is a bit different. However, I think it is the best interpretation I could do. The colors ended up being very accurate and, at the very least, I'm proud that I got it to stand up on its own!
If I were to redo this project, I would definitely start with the pinch pot method - my first attempt was making the entire body one shape and then hollowing it out, which was a massive waste of time. I would also focus a bit more on the proportions of the original. My piece ended up being a lot more top-heavy than the drawing, which made construction needlessly difficult. I should have put more bulk into the body than the head. I also was so confused by the drawing's mouth that I ended up ignoring most of the detail in that area. Now I would probably make more of an attempt to figure out what was going on there (is that a watermelon or teeth or both?) but I thought it was better to do nothing than to add incorrect details.
Progress Pictures


Alebrije
1. Wedge clay and form two pinch pots, one small and one larger. Score and slip them together, forming a cylinder. Pinch the smaller end to form a conical shape. Poke a hole in the bottom.
2. Form a circle for the head, pulling out the front to form a point on which to add the beak. Create a hooked beak shape and score + slip it on.
3. Press in a shape for the eyes, using a needle tool to define the wrinkles around the face.
4. Using a small loop tool, carve out ridges for the 'eyebrows'. Form an s-shape for the neck, hollowing it out. Hollow out the head from the bottom, then score and slip the neck and head together. Carve out a hole on top of the body, then score the neck on so that the holes line up.
5. Form a triangle shape for the tail feathers, using a knife to carve out feather shapes. Form smaller feather shapes and score them on top. Then, score and slip this onto the conical end of the body. Use a needle tool to indicate feathers around the neck.
6. Poke holes near the shoulders, where the wings will be added. Fire at cone 05-06.
7. Paint with acrylic paint. Add a wire structure for the wings, then cover in paper to create feathers. Add paper around the neck to create a ruff.
Reflection:
I am really proud of this piece! My animal was a California Condor, and I think my version is recognizable even with the unnatural colors. I have a lot of fun with this piece; I definitely would not use colors like this normally, so it was interesting to step outside of my comfort zone. The face is a little bit silly, but to be fair, real condors also look a little silly. If I were to change anything, I would have changed the pose a bit so that it was perched - the laying down pose is easier, but it might have been a bit more impressive with more added height.


Set of 4
Plan:
1. Wedge clay and split into even spheres.
2. For each sphere, create a pinch pot by making a hole and pressing against the side. Once the hole is big enough, pull out the sides to create a wide, shallow shape.
3. Flatten the top by dropping the pinch pot upside down. Keep flattening it until there is a shallow plate shape.
4. Using a loop tool, dig out a trench around the center so that there is a raised circle.
5. Fire at cone 05-06. Once fired, paint designs on the plates with Mayco Glaze. Fire at cone 05-06 again.
Reflection:
I was happy with this before it was fired. I didn't realize how strong the terracotta color would be underneath, and I needed to put on quite a few more layers of glaze to cover it up. The designs definitely would have been cute if they weren't so muddy after firing. The plates are more or less the same size, which I am proud of. I will keep the color issue in mind next time I use terracotta.

Lidded Box
Plan:
1. Wedge clay, then flatten with a slab roller. Cut out two rectangles for the top and bottom of the box. Cut out two shorter rectangles for the ends, and two longer rectangles for the sides of the box.
2. Score and slip the sides and ends onto the bottom rectangle, smoothing out the cracks with a fettling knife and making sure there is enough slip in the corners to hold the sides together.
3. Score thin ruffle shapes onto the sides for the folds of the bedsheets, using a loop tool to emphasize the folds.
4. On the top rectangle, score on two strips of clay slightly shorter than the sides so that the top is held in place. Add a square shape for the pillow.
5. On one end of the box, score on 5 cylindrical shapes for the headboard. Take a long cylinder and arc it above, scoring onto the outermost bedposts.
6. Form a pill shape, adding a crest on the stomach. Score on a smaller sphere for Gregor's head, and add two petal shapes connecting the body and head. Using a needle tool, add indications of the segmented abdomen.
7. Hollow Gregor out from the back, leaving a hole. Using a needle tool, poke holes in the body and head to hold wire legs and antennae later. Score Gregor onto the lid.
8. Fire at Cone 05-06. Glaze with Mayco Glaze, then fire again.
Reflection: I am very proud of this box! I am mostly just happy it survived the kiln, since I wasn't sure how safe Gregor would be -- it was hard to keep him hollow. However, he made it out alive and the holes for the wire stayed open. I like how the glaze on the bed came out and I am proud of the folds holding their shape. Also, considering I made things harder for myself with the bedframe making the opening of the box a different shape, I managed to get the lid to fit well. I am going to add wire for Gregor's legs and antennae and will add a picture once that part is complete.